Grandma's Four-Strand Braided Rug
Interlocking the rows of braid, eliminating the need for sewing.
January/February 1979
The familiar braided wool rug has certainly stood the test of time, but my grandmother taught me-years ago-how to braid another kind of rug ... and her method produces a floor covering. that's as easy to, make as the traditional patterns, and a, lot more practical, too. You see, Grandma showed me a way to interlock the rows of braid, which eliminate* the whole process of sewing the rug together, at the same time giving the rug-maker greater control over his or her colors. Best of all, though-since my grandmother's rugs are made from Inexpensive cotton, synthetic, or blended fabric scraps-they don't cost much (if anything) to make, and they're washable!
THE TOOLS OF THE TRADE
If you'd like to braid one of these lovely rugs, you'll need, a pile of fabric scraps, a pair of scissors, four medium-sized safety pins, and a needle and thread-(A sewing machine Makes the Job of 'preparing the scraps easier, but you can get by without-one.) To begin, cut your rags-on either the lengthwise or crosswise grain - Into the longest strips possible. These bands should be two inches wide and (ideally) three to five feet long. (Tear the strips-when you can-to save time - . and sew short pieces together to get the right lengths.) Next, fold each strip's raw edges into the center, and then refold along the middle of the strips to hide those tumed-under edges. If you do have a sewing machine, stitch the folds closed as you go ... to make a permanent crease. If you don't own a machine, just baste or Iron the folds in place. After that task is done, sort the strips-by color-into bags or boxes. You don't have to fuss too much over the design (unless you want to), but even a hit-or-miss pattern will look sharper If a particular color (usually a dark one) is saved for the outer border. Also, remember that a small amount of any hut will be Most, effective if used in the center of the rug.
PLAN AHEAD
You'll have to decide how big your rug will be before you start it, because those proportions will tell you how long to make the center braid. As a rule of thumb, the length of that braid can be found by subtracting your planned rug's width from Its length. A 2' X 3' rug, then, will need one foot of center braid, while a 3' X 5' rug will require two feet. (A round rug, as you'll 'see, only needs a few Inches of center braid.) We best not to be too ambitious at least until you get the hang of, lour-strand braiding. If you Went ]to make a 21 X 31 rug -Which is a good size for your first project-you'll have to gather three or four pounds of scraps.
BRAID AWAY!
To make the center braid, pick three strips of cloth and sew them to together at one end. Make sure these are of different lengths, and keep the lengths varied as you sew strips onto those that are braided In ... because three stitched connections-if too close together-will produce a weak spot in the rug. If you can find someone to hold the sewed ends while you braid (as you would hair) the center piece, you'll produce a straighter, more even braid. Make this central "rope" an inch longer than you determined by the lengt- minus-width formula above, as the end will have to turn back on itself when you begin to work on the next layer of rug. (To start a round rug, just braid two or three inches, and fold this center braid over to form a "core.) With your center braid done, sew a fourth cloth strip under the last crossover formed by the original three. This will give you the four strands that you'll need to follow Grandma's "interlocking" method. Then, fasten a safety pin-to use as a "needle"-to the end of each strip.
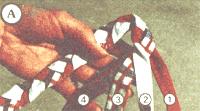
If you're right-handed, hold the "working" end of the braid in your left hand (or vice versa for southpaws), and fold back that extra inch so that the four strands lie side by side-to the right of the braid-as shown in Photo A.
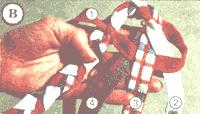
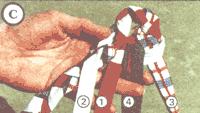
Now, imagine that the strips are numbered-one through four -from right to left. Take strip No. I and "weave" it over strip No. 2, under strip No. 3, and over strip No. 4. Then. using the safety pin as a needle, pull strip No. I through the adjacent loop of the center braid as shown In Photo B. Strip No. 2 (the new "outside strand) can then be woven over No. 3, under No. 4, over No. 1, and through the next loop of the center braid. (See Photo C.) This process of weaving the outer strip over ... under ... and over the other three, and then through succeeding loops of the center braid, will continue (with some variations ... see below) until the rug is finished. (You'll have to, of course, keep sewing new strips to the unbraided ends as you go.)
KEEP IT FLAT
Every time you round a corner your rug will have a tendency to .pucker". To compensate for this, just braid more than one strip through each center braid loop as you round these turns. For example, on your first row around the ends of the center braid you may have to weave through one loop five or six times. When you next go around the same spot, though, braiding twice through every other loop might be sufficient. It's impossible to give strict rules for this, except that fewer of these ..extra" passes through one loop will be necessary as the rug grows. Just work on a level surface-so you can see If the rug stays flat-and braid two strips through the same strip more often if the center starts to pucker. If the edges of the rug begin to look frilly, on the other hand, use fewer of these extra "corner" weaves. Finally, when your rug is the right size, trim each strip to about an inch long, weave each of these tips under a loop, and stitch 'em all in place. That's all there Is to It. So why not dig out those boxes of old clothes or scraps of sewing material and recycle them into a beautiful rug, "just like Grandma used to make"?
 |
 |
 |
 |
|
|